Eurostone sand

For natural stone paver joints, up to 1.5" (3.8 cm)

TRADITIONAL APPLICATIONS
setting time: 1 hour above 32°F (0°C)

OVERLAY APPLICATIONS
Setting time: 24 hours above 32°F (0°C)

IMPORTANT INSTALLATION NOTES

PLEASE NOTE:
All stone pavers must be completely interlocked for vehicular and pedestrian use. If stone pavers are fanned they are not considered interlocked. EUROSTONE BOND can be applied when stone pavers are installed directly open graded aggregates that lock or choke themselves. This means the EUROSTONE BOND polymeric sand will not migrate through the voids. Do not apply EUROSTONE BOND when the pavers are installed directly on aggregates with large voids.

THIS CROSS-SECTION REPRESENTS THE HEIGHT OF POLYMERIC SAND FOUND IN THE JOINTS

Maximum joint width: 1-1/2″

REQUIRED SUB-SURFACE PREPARATION AND FOUNDATION OPTIONS

EUROSTONE BOND  is recommended for a variety of uses including pool decks, patios, footpaths, driveways, parking spaces, pavements etc. The natural stone pavers must be installed on a traditional base system composed of 2 layers. The upper layer can have a maximum of 1 inch (25 mm) of bedding C 33 sand or ASTM No.9 stone. The lower layer must have a minimum of 6 inches (15 cm) of crushed stone compacted at 98 % Proctor density. (See diagrams below)

FOR OVERLAY APPLICATIONS

  1. Remove all loose and fragile concrete.
  2. Cover the surface with a Gator Fabric GF4.4, refill with crushed stone and compact it.
  3. C 33 Sand or ASTM No. 9 Stone can be used under natural stone pavers as a bedding layer.

1 Traditional base system:

  • A minimum 2% top surface slope for proper water runoff
  • EUROSTONE BOND at least 1/8″ (3 mm) below the paver stone surface.
  • Minimum  depth of joint 1-1/2″ (38 mm)
  • Maximum joint width  1-1/2″ (38 mm)
  • Layer of bedding sand maximum of 1″ (25 mm)
  • Layer of 6″ (15 cm) thickness of 0-3/4″ (0-20 mm) compacted crushed stone
  • For light or heavy traffic applications the stone pavers must  be completely interlocked

2 Overlay base system:

  • A minimum 2% top surface slope for proper water runoff
  • EUROSTONE BOND at least 1/8″ (3 mm) below the paver stone surface.
  • Minimum  depth of joint 1-1/2″ (38 mm)
  • Maximum joint width 1-1/2″ (38 mm)
  • Layer of permeable mortar bed
  • Layer of 6″ (15 cm) thickness of 0-3/4″ (0-20 mm) compacted crushed stone
  • For light or heavy traffic applications the stone pavers must  be completely interlocked

3 Overlay base system:

  • A minimum 2% top surface slope for proper water runoff
  • EUROSTONE BOND at least 1/8″ (3 mm) below the paver stone surface.
  • Minimum  depth of joint 1-1/2″ (38 mm)
  • Maximum joint width  1-1/2″ (38 mm)
  • Layer of bedding sand maximum of 1″ (25 mm)
  • Layer of 4″ (10 cm) thickness of concrete with 2″ (5 cm) drainage hole every 10 feet filled with 3/8″ (9 mm) clean stone and cover with a geotextile for water evacuation
  • For light or heavy traffic applications the stone pavers must be completely interlocked

Installation Instructions

(METHOD for applying EUROSTONE BOND for a TRADITIONAL BASE SYSTEM on a NEW NATURAL STONE PAVER SURFACE:)

  1. Always refer to the latest EUROSTONE BOND Technical Data Sheet (TDS) at AllianceGator.com before installing EUROSTONE BOND.
  2. Installation of natural stone pavers must be done in accordance with a drainage foundation before adding EUROSTONE BOND.
  3. Natural stone pavers’ sides and top surfaces must be completely dry. Do not apply if the natural stone pavers surfaces are damp or wet. The damp or wet surface will cause EUROSTONE BOND to prematurely activate and will lead to the polymers sticking on the natural stone pavers surfaces.
  4. Do not apply EUROSTONE BOND, if the natural stone pavers joints are damp or wet. This will prevent the EUROSTONE BOND from properly sliding into the joints and obtaining very densely packed joints, which is critical to the product’s performance.
  5. Temperature must be above 0°C with dry conditions. A minimum of 1 hour of dry weather is required after activation of the EUROSTONE BOND.
  6. For all natural stone pavers surfaces, and particularly around in-ground pools, there must be a minimum slope of 1/8’’ (3 mm) per 12’’ (30 cm) away from the edge of the pool or structures to ensure water evacuation off the paver surface.
  7. For the pool coping units, it is mandatory to use mortar in the joints. For the rest of the natural stone pavers installation around the pool, you can use EUROSTONE BOND.
  8. Do not sweep EUROSTONE BOND over asphalt.
  9. Install EUROSTONE BOND a minimum of 1/8’’ (3 mm) below top of natural stone paver’s surface or 1/8’’ (3 mm) below the chamfer. The filled and cured polymeric sand joints should never be in direct contact with foot traffic or tires, because erosion may occur.
STEP 1
Spread EUROSTONE BOND with hard-bristle broom. Make sure the EUROSTONE BOND completely fills the joints. Do not use with other materials in the joints. Leave a layer of EUROSTONE BOND on the surface to aid in the vibrating and consolidation of EUROSTONE BOND into joints.
STEP 2
Vibrate the EUROSTONE BOND into the natural stone pavers joints using a vibratory plate compactor. A rubber pad is recommended. A roller compactor or handheld tamper is best for natural stone slabs installations. Joints sand level must be at least 1/8’’ (3 mm) below top of natural stone pavers surfaces. It is best to compact in several directions to ensure there are no air gaps or voids in the joints. Repeat steps 1 and 2 to ensure joints are filled and consolidated. Narrow joints require more care to completely fill.
STEP 3
Sweep off excess EUROSTONE BOND from the paved surface, first with a hard-bristle broom, then a soft-bristle broom. Take care to leave the height of EUROSTONE BOND at least 1/8’’ (3 mm) below top of natural stone pavers surface.

WATER ACTIVATION (IMPORTANT NOTES)

  1. Work in manageable sections, ideally about 50 sq. ft (4.6 sq..m.). at a time, depending on temperature.
  2. Do not allow EUROSTONE BOND to wash out of joint.
  3. Never allow paved surface to dry out during the water activation phase.
  4. Watering must be started at the lowest point of the paved surface.
  5. Use a watering gun connected to a hose. Setting should be set to shower.
STEP 4
Shower for a minimum of 90 seconds for 50 sq. ft. (4.6 sq. m.) or until the EUROSTONE BOND repels the water and the water starts to accumulate over the polymeric sand joints.
NOTE
Use a leaf blower to remove any excess water remaining on the natural stone pores and crevices. This blowing action is necessary to help remove any remaining EUROSTONE BOND residue left on the natural stone surface from the previous steps. If not done properly, a white haze may appear on paver surface after installation. This is due to excess EUROSTONE BOND residue left on natural stone paver surfaces. This haze will dissipate over time, or it could be removed by using GATOR CLEAN Efflorescence Cleaner.

INSTALLATION INSTRUCTIONS

(For an existing natural stone paver surface)

STEP 1
Remove existing jointing material. Be careful not to disturb the bedding material under the natural stone pavers. Natural stone pavers must be completely dry before installing a minimum of 1 1/2’’ (38 mm) deep into the joints. Ensure that EUROSTONE BOND lies at least 1/8 inch (3 mm) below top of the natural stone pavers surface or 1/8 inch (3 mm) below the chamfer. The filled and cured polymeric sand joints should never be in direct contact with foot traffic or tires.
STEP 2
Follow step 1 to step 4 of NEW STONE JOB instructions (above).

INSTALLATION INSTRUCTIONS

(For an OVERLAY BASE SYSTEM for a NEW NATURAL STONE PAVERS SURFACE)

IMPORTANT INSTALLATIONS NOTES
Graphic A Make sure the natural stone pavers are completely fixed in permeable mortar sand and cannot move. Graphic B Having a layer of bedding sand maximum of 1” (25 mm), covering a 4” (10 cm) thickness of concrete with 2” (5 cm) drainage hole every 10 feet (3 m) filled with ⅜’’ (9 mm) clean stone and cover with a geotextile GF 4.4 for water evacuation. Graphics A/B Make sure the sides and top surfaces of the natural stone pavers are dry before applying the EUROSTONE BOND polymeric sand.
STEP 1
Sweep EUROSTONE BOND in between the natural stone pavers joints.
STEP 2
Compact the sand between the joints with the help of a vibrating plate and a hand tamper in restricted areas.
STEP 3
Sweep off all excess EUROSTONE BOND that is on the natural stone paver surfaces. The EUROSTONE BOND must lie at least 1/8 inch (3 mm) below top of the natural stone pavers surface or 1/8 inch (3 mm) below the chamfer. It is best to compact in several directions to ensure there are no air gaps or voids of the natural stone pavers joints or erosion may occur. The filled and cured polymeric sand joints should never be in direct contact with foot traffic or tires. Repeat twice the sweeping and compacting of the joint to ensure a good consolidation of the joint. Narrow joints require more care to completely fill. Using a leaf blower, remove any EUROSTONE BOND residue from the natural stone pavers surfaces. Depending on the physical layout, it may be more appropriate to remove residue by using a vacuum unit.
STEP 4
Use a watering gun connected to a hose. Setting should be set to shower. Shower for a minimum of 90 seconds for 50 sq. ft. (4.6 sq. m.) or until the EUROSTONE BOND repels the water and the water starts to accumulate over the polymeric sand joints.
Note:
Use a leaf blower to remove any excess water remaining on the natural stone pores and crevices. This blowing action is necessary to help remove any remaining EUROSTONE BOND residue left on the natural stone surface from the previous steps. If not done properly, a white haze may appear on paver surface after installation. This is due to excess EUROSTONE BOND residue left on natural stone paver surfaces. This haze will dissipate over time, or it could be removed by using GATOR CLEAN Efflorescence Cleaner.
Alliance Gator offers a 15 year limited warranty on their polymeric sands. See warranty section for more information.
All Alliance Gator polymeric sand come in waterproof bags.
Please note that this limited warranty applies when the product is used for residential purposes exclusively (home owners or contractors using the product for single or multi-unit dwellings that are exclusively for residential use). The manufacturer cannot guarantee results as it has no control over surface and sub-surface preparation and product application. (Proper installation of natural stone pavers to ensure long-term stability of work, including granular foundation of certified crushed stone of 0-3/4 inch (0-20 mm) bedding layer and appropriate installation of borders in accordance with above specified method for applying product). However, for a period of 15 years from purchase, the manufacturer agrees to refund the purchase price if the product is proven to be defective and on the condition that it was installed pursuant to the method of application of surface and sub-surface preparation described above. Proof of purchase is required for any claim.
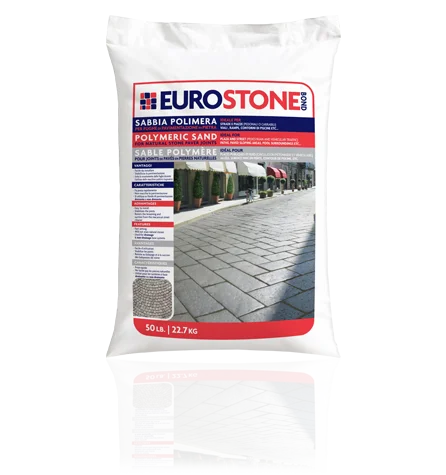
THE PARTIES AGREE THAT REFUND OF THE PURCHASE PRICE AS STATED IS THE ONLY OBLIGATION OF THE MANUFACTURER. IN ALL EVENTS, THE MANUFACTURER SHALL NOT BE LIABLE FOR ANY OTHER DAMAGES OR COSTS WHATSOEVER, (INCLUDING REMOVAL OR REINSTALLATION OF SAND OR NATURAL STONE PAVERS) DIRECT OR CONSEQUENTIAL. TO THE EXTENT PERMITTED BY LAW, THE MANUFACTURER EXCLUDES ANY IMPLIED WARRANTY OF QUALITY, MERCHANTABILITY OR FITNESS FOR PURPOSE. ALLIANCE DESIGNER PRODUCTS INC. excludes any responsibility for the presence of moss, mold, mildew, or similar factors that may occur on the product after its installation. ALLIANCE DESIGNER PRODUCTS INC. excludes any responsibility for use of EUROSTONE BOND with Clay Pavers or any installation not installed to manufacturer’s specifications and ICPI Tech Spec #2.